The WCh French
Robert Ris looks at Gukesh's 7.a3!?
Our starting moves are 1.e4 e6 2.d4 d5 3.Nc3 Nf6 4.e5 Nfd7 5.Nce2 c5 6.c3 Nc6.
In this article I'm going to examine a very interesting opening idea by the new World Champion. Throughout the World Championship match, Gukesh came up with a lot of interesting new opening ideas, and personally I found his approach in his last White game (Game 13) quite fascinating.
In the well-known variation of the Classical French, Gukesh opted for the setup with White's knight dropping back from c3 to e2, with the aim of strengthening his pawn chain with c2-c3 soon after. This idea is not new and has been employed already many times by strong grandmasters. A typical French battle follows in which White aims to hold on to his space advantage and Black attempts to challenge White's chain. White's main options here are 7.f4 and 7.Nf3, both leading to interesting play with chances for both sides.
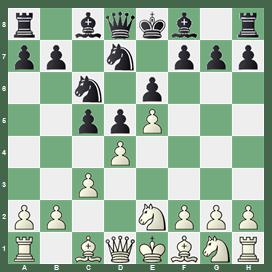
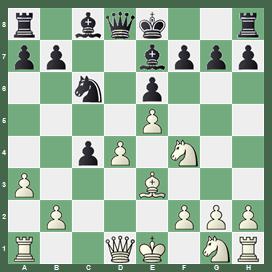
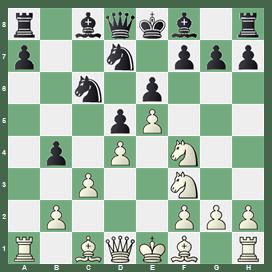
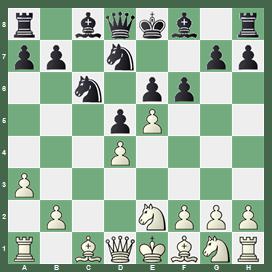
Gukesh instead decided to try the relatively unknown 7.a3!?,
a useful waiting move. Black has a lot of interesting options so let's have a closer look.
In my opinion there are five critical ideas we need to examine: A) 7...Qb6?!, B) 7...Be7, C) 7...a5, D) 7...b5 and E) 7...cxd4 8.cxd4 f6.
A) 7...Qb6?!
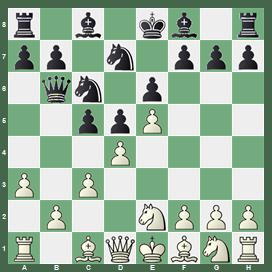
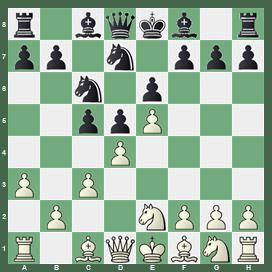
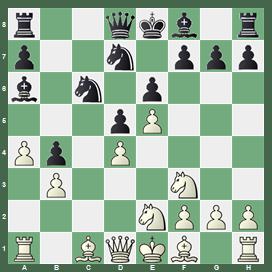
A French player should always consider the option of challenging White's weak points of the pawn chain (b2 and d4). However, here it no longer has the desired effect, as White can reply with 8.b4 cxd4 9.cxd4 with a very comfortable position. Because of the knight on d7, Black is unable the complete their development of the queenside. Undermining White's queenside with 9...a5 can be met with the powerful pawn sacrifice 10.b5! Qxb5 11.Nc3 Qb6 12.Nge2.

Black's extra pawn on the queenside isn't worth anything, as White nicely controls the b5-square and has all the chances to build up the pressure at the other side of the board as well.
Presumably, Ding Liren also had seen this idea, and after spending 17 minutes he eventually decided to go for ...
B) 7...Be7
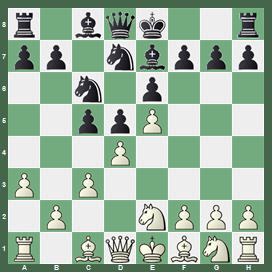
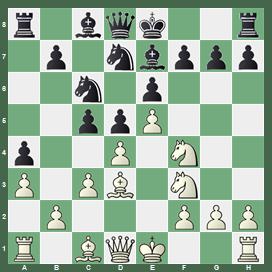
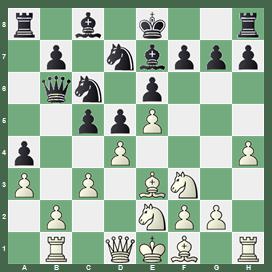
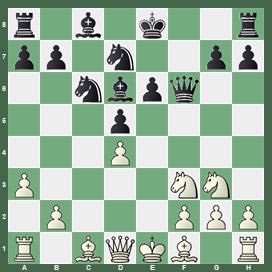
A fairly natural developing move, but here 8.Be3!? is the main point behind White's play. He consciously decides to postpone the development of his king's knight and instead strengthens his pawn chain with the support of his bishop. By doing so, White remains very flexible and prepares to move the knight away from e2 to f4. Ding spent here another 37 minutes on his next move, but after 8...Nb6?! 9.Nf4! cxd4 10.cxd4 Nc4 11.Bxc4 dxc4
Black's position is already quite suspicious, as Gukesh played 12.Qg4! here, Black fails either to mobilize his queenside majority or obtain control over the d5-square. For more detailed analyses please check out the notes on Gukesh,D - Ding,L.
C) 7...a5

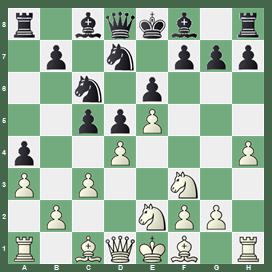
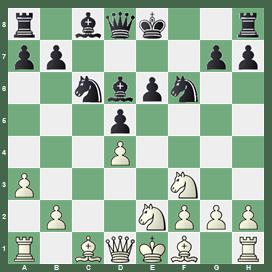
A typical response preventing White's expansion on the queenside. The critical move is 8.Nf3 when play is likely going to transpose to variations usually arising from 7.Nf3. Black has to act immediately. After something like 8...Be7?! 9.Nf4 a4 10.Bd3!
White obtains a dream position, as his minor pieces are no longer hindering each other. In the model game Ponomariov-Ni Hua, White got a very nice attack (see the notes on the game Carlsen,M - Nepomniachtchi,I 1-0).
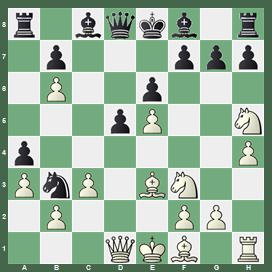
Instead, the critical continuation is 8...a4! when White starts to seize initiative on the other side of the board with 9.h4!?.
Interestingly, this position was reached in two games between Magnus Carlsen and Ian Nepomniachtchi. In the first game Black went for 9...Qa5 10.Bd2 Qb6!.
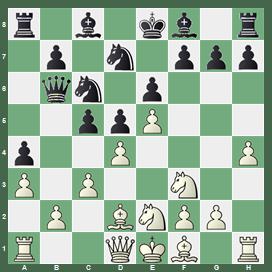
A well-known idea, which highlights White's coordination problems, as he has to protect his pawns on b2 and d4 first. There followed 11.Rb1 Be7 12.Be3.
Here Nepo went for 12...0-0? clearly underestimating White's attacking potential, as the game lasted only 23 moves! Instead, the key move for Black to hold the balance is 12...Qa5! pinning the pawn on c3 and preventing White from recapturing on d4 with a pawn. In that case there is nothing better than to just repeat moves with 13.Bd2 Qb6= etc. To avoid an immediate repetition I looked at minor improvements like 10.Bf4 and 11.Rh3!?. In my opinion the second option offers White better practical chances to get a complicated middlegame without too many forcing variations.

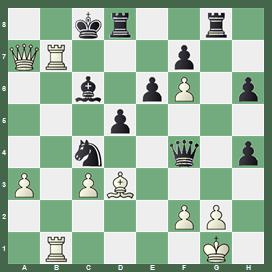
In the diagram above, the final position of the 1st game between Carlsen and Nepomniachtchi Black resigned as 24.Ng5 is coming next.
Ten days after this catastrophe, Nepo repeated the same variation in a crucial must-win game during the finals of the World Blitz Championships in New York. Since a draw wasn't suitable, he decided to deviate with 9...Nb6?! which led to a fascinating though objectively somewhat dubious middlegame for Black. After 10.Nf4 Na5 White's play can be improved here with 11.dxc5! (which eventually leads to a clear advantage for him. My guess is that Magnus didn't see any reasons complicating matters by going for the exchange sacrifice: 11...Nb3 12.cxb6 Nxa1 13.Be3 Nb3 14.Nh5.
With the impending manoeuvre Rh3-g3, Black's position is on the verge of collapse. After this missed opportunity, Nepo showed his great tactical skills by launching a massive attack against the white king and managed to win with Black in only 31 moves.
Exercise: Black to play and win!
See analysis of these two games: Carlsen,M - Nepomniachtchi,I 1-0.
D) 7...b5

Expanding on the queenside is one of Black's thematical ideas to gain more space for his own pieces and put White under pressure. The move has often been played against 7.Nf3, but it's likely going to be transposition.
Also in this line Magnus Carlsen has some positive experience as he managed to demolish his former second in great style, definitely a game worth playing through: Carlsen,M - Fressinet,L 1-0. On move 8 Black has once again many options. Some key points to help you understand these pawn structures better:
1) 8...b4? is a positional mistake since after 9.axb4 cxb4 10.Nf4
Black does no longer have any pressure against White's centre. Note that breaking through in the centre with c3-c4 has become a serious threat!
2) After 8...cxd4 9.cxd4 b4 White is recommended to keep the queenside closed with 10.a4! Ba6 11.b3!.
With moves like h2-h4, Rh3 and Nf4 White will quickly seize the initiative on the kingside.
3) In the notes of Carlsen,M - Fressinet,L 1-0, you'll come across a number of lines in which White may actually prefer to recapture with a piece on d4 (rather than the automatic cxd4, keeping the pawn structure intact). As usual, it all depends on the exact circumstances, but please keep that in mind as an important alternative, as it may give your attacking chances a boost.
E) 7...cxd4 8.cxd4 f6
Last, but not least, we should not forget the dynamical response of an early ...f7-f6. In my opinion the critical test is 9.exf6 (9.Nf4 is covered in detail as well, but I failed to prove anything for White.) when Black has to decide whether to recapture with either the knight or queen.
E1) In the game Ladron de Guevara Pinto,P - Adla,D 0-1 Black went for 9...Qxf6 and soon got a winning advantage when White misplayed it. The critical line is 10.Nf3 Bd6 11.Ng3
and now play becomes pretty sharp after the central push 11...e5. I have analysed things further up till move 22, concluding that despite the equal nature of the position, with two pawns for the exchange White has ample compensation and still some practical chances.
E2) The alternative 9...Nxf6 10.Nf3 Bd6
looks like a position which could arise from the Tarrasch Variation (3.Nd2). White has a number of options now, all leading to more or less even middlegame positions but in which there is still plenty to play for, discussed in the notes on Ladron de Guevara Pinto,P - Adla,D 0-1.
Conclusion: In my opinion 7.a3!? is leading to a fascinating and complicated middlegame battle in which White tries hard to build up attacking chances thanks to their space advantage in the centre. Not many games have been played recently, but the fact that the system has been employed by both Gukesh and Carlsen and that Black players Ding Liren and Nepomniachtchi got into some serious trouble, indicates that matters aren't that simple at all. For those who are playing it from the black side, I would recommend to have a closer look at either line C) 7...a5 if you are looking for a doubled-edged middlegame, while line E) 7...cxd4 8.cxd4 f6 leads to simpler type of play.